-
Joomla51 Extensions
- Disabling localstorage in J51 module extensions
- Setting up the J51 Carousel module
- Setting up the J51 GridGallery
- Setting up the J51 Icons
- Setting up the J51 ImageLinkHover
- Setting up the J51 LayerSlideshow module
- Setting up the J51 Menu module
- Setting up the J51 News Module
- Setting up the J51 Numbers module
- Setting up the J51 Progress module
- Setting up the J51 Slideshow
- Setting up the J51 Thumbs Gallery
- Troubleshooting the J51 Slideshow
- Troubleshooting the J51 Thumbs Gallery
On some of our modules we save browser capability values to localStorage, this ensures the module will not recheck again until browser get upgraded or a user clears the localStorage manually in their browser. This is only relavent with the following Joomla51 module extensions..
- J51 LayerSlideshow
- J51 Rotate
- J51 ImageHover
- J51 News
- J51 Testimonials
You may find that this goes against some local GDPR guidelines and require this feature to be disabled. To do so you can go through the following steps.
- Create an override for your module. A override allows you to override the output of your module and are located in the ./html folder of your template (Eg. ../templates[YourTemplate/html). Note that an override for your module may already exist. If it does you will be editing your existing override rather than creating a new one. You can check if an override exists by checking your templates html folder. Overrides are stored in a self titled sub-folder of the html folder.
- Presuming there is no existing override for your module, navigate to your template customiser (Joomla 4: System -> Site Templates -> [YourTemplate])
- Click in to the Create Overrides tab and select the module you wish to override
- Once you created the override, click back in to the Editor tab
- Navigate to the ./html folder and locate the override you have just created (Eg. ./html/j51_rotate/default.php
- In your override code, locate where the slider object is been set. It will look something like the following...
var slider = tns({ container: "#layerslideshow'.$j51_moduleid.'", mode: "gallery", items: 1, slideBy: "page", controls: true, autoplay: '.$autoplay.', autoplayTimeout: '.$autoplaySpeed.', speed: '.$speed.' }); - To the end of the slider object, add a useLocalStorage property and set it to false. Eg.
var slider = tns({ container: "#layerslideshow'.$j51_moduleid.'", mode: "gallery", items: 1, slideBy: "page", controls: true, autoplay: '.$autoplay.', autoplayTimeout: '.$autoplaySpeed.', speed: '.$speed.' useLocalStorage: false }); - Click Save & Close
Note: Ensure to repeat the above for all relavent modules.
In this article, we will go through some of the main points in setting up the J51 Menu module. This simple but versatile module is a perfect solution for any restaurant, bar or cafe related website looking to display a clean and stylish online version of its menu. Fully stacked with a collection of layout and styling options, J51 Menu allows you complete control of your menu across all devices.
If you haven't already done so you must first install the J51 Menu module via your Joomla Extensions Manager. From your Joomla administration navigate to Extensions -> Manage -> Install -> Upload Package File. Select your module install file (mod_j51menu.zip). This file can be found in your template download in the same folder as your template install file.
Once installed you can create a new instance of your J51 News module by navigating to Extensions -> Modules -> New -> J51_Menu. Multiple instances of your Menu module, or indeed any module can be achieved by simply repeating this process.
The Menu modules settings are split across three main tabs, General Settings, Menu and Responsive Options.
General Settings
- Number of Columns - Set the number of columns to display your menu in
- Column Gap - Set the gap between each column in px
- Columns Split Group - Enable to split columns within groups
- Group Spacing - Set the vertical gap between groups in px
- Item Spacing - Set the vertical gap between menu items in px
- Group Title Tag - Set the HTML tag for group titles
- Group Title Color - Set the group title color
- Item Title Tag - Set the HTML tag for menu items
- Item Title Color - Set the menu items color
- Item Price Tag - Set the HTML tag for menu item prices
- Item Price Color - Set the menu items price color
- Item Description Tag - Set the HTML tag for menu item description
- Item Description Color - Set the menu items description color
Menu
- Menu Group - Create and title groups for your menu items. Multiple Groups can be created, moved or deleted using the options available
- Menu Item*
- Title - The for your menu item
- Description - The description for your menu item
- Price - The price of your menu item
Responsive Options
- Columns (Tab Landscape) - Set the number of columns to display your menu in on table landscape
- Columns (Tab Portrait) - Set the number of columns to display your menu in on table portrait
- Columns (Mob Landscape) - Set the number of columns to display your menu in on mobile landscape
- Columns (Mob Portrait) - Set the number of columns to display your menu in on mobile portrait
Progress bars are a popular website element. These elements are great for displaying varying types of data to your users in an eye-catching and stylish manner. The J51 Progress module allows you to quickly and easily create these elements within your Joomla project.
If you haven't already done so you must first install the J51 Progress module via your Joomla Extensions Manager. From your Joomla administration navigate to Extensions -> Manage -> Install -> Upload Package File. Select your module install file (mod_j51progress.zip). This file can be found in your template download in the same folder as your template install file.
Once installed you can create a new instance of your J51 Progress module by navigating to Extensions -> Modules -> New -> J51_Progress. Multiple instances of your Progress module, or indeed any module can be achieved by simply repeating this process.
Module settings are split into 3 tabs...
General Settings
This tab contains the main layout/style settings for your module.
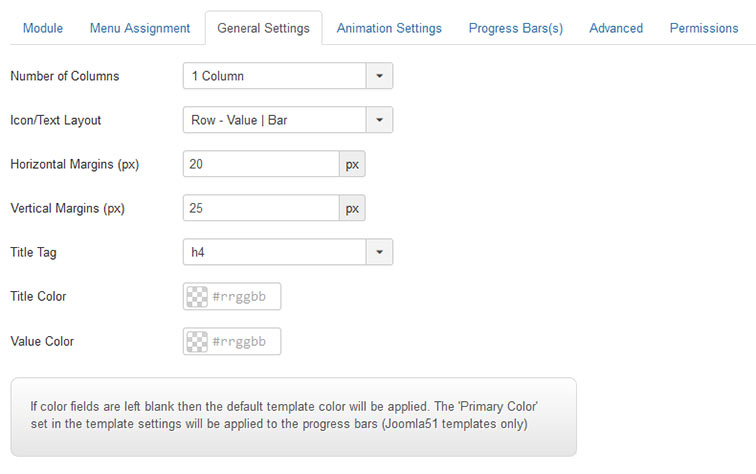
- Number of Columns - Select the number of columns you wish your progress bars to be displayed in. On smaller screen devices the number of columns will always be reduced to 1 regardless of this setting.
- Icon/Text Layout - Set the layout of each progress bar. Currently, this field gives you 2 options. Row - Value | Bar which displays the progress bar to the right of its value and Row - Bar | Value which displays the progress bar to the left of its value.
- Horizontal Margin - Horizontal spacing in pixels between each progress bar.
- Vertical Margin - Vertical spacing in pixels between each progress bar.
- Title Tag - Set the HTML tag (H1, H2, H3 etc.) for the title of each progress bar
- Title Color - Set the color of each progress bar title. Note that if left blank, the default template color set for the heading tag set in the previous field will be used.
- Value Color - Set the value color for each progress bar. Note that if left black the default template body text color will be used.
Animation Settings
The J51 Progress module allows you to animate each progress bar as it scrolls into view. This tab contains settings for controlling this animation.
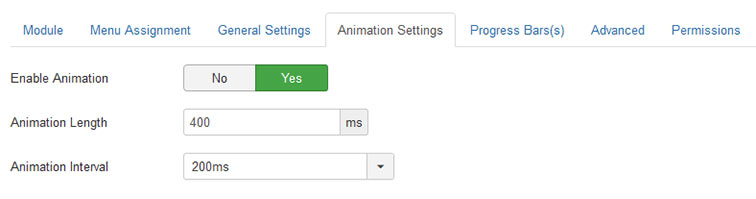
- Enable Animation - Enable/Disable the animation on scroll.
- Animation Length - Set the length of the animation in milliseconds (1000 milliseconds = 1 second). This is the length of the animation for each progress bar, sliding from 0 to its value.
- Animation Interval - Set the interval in milliseconds of the animation between each progress bar. Rather than all progress bars animating at once, this option allows you to set a slight delay between each progress bar.
Progress bar(s)
The final tab is where you add the details for each of your progress bars. For a new progress bar simply click the '+' sign for each bar you wish to create. Repeat for each progress bar you wish to add. To remove a progress bar hit the '-' option. Order of your progress bars can be changed by using the drag n drop option.

- Item Title - Set the title for the progress bar.
- Item Caption - Set the value for the progress bar.
- Item Value - Set the vertical height of the progress bar.
- Item Color - Set the color of the progress bar.
The following details setting up the J51 Numbers module. This module is perfect for displaying stats relative to your brand in an attention-grabbing manner. Each number will animate from 0 to its value as the user scrolls the module into view. The module is very simple to set up allowing you to add unlimited stats quickly and easily.
If you haven't already done so you must first install the J51 Numbers module via your Joomla Extensions Manager. From your Joomla administration navigate to Extensions -> Manage -> Install -> Upload Package File. Select your module install file (mod_j51numbers.zip). This file can be found in your template download in the same folder as your template install file.
Once installed you can create a new instance of your J51 Numbers module by navigating to Extensions -> Modules -> New -> J51_Numbers. Multiple instances of your Numbers module, or indeed any module can be achieved by simply repeating this process.
Module settings are split into 3 tabs...
General Settings
This tab contains the main layout/style settings for your module.
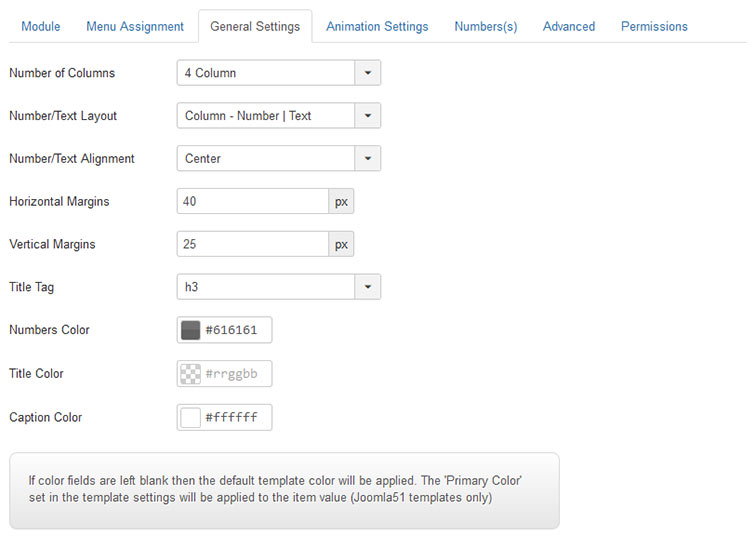
- Number of Columns - Select the number of columns you wish your items to be displayed in. On smaller screen devices the number of columns will always be reduced to 1 regardless of this setting.
- Icon/Text Layout - Set the layout of each item. Currently, this field gives you 4 options. Column - Number | Text which displays the number above the text, Column - Text | Number which displays the number below the text, Row - Number | Text which displays the number to the left of the text and finally Row - Text | Number which displays the number to the right of the text.
- Number/Text Alignment - Set the text alignment of each item (left, center or right).
- Horizontal Margin - Horizontal spacing in pixels between each item.
- Vertical Margin - Vertical spacing in pixels between each item.
- Title Tag - Set the HTML tag (H1, H2, H3 etc.) for the title of each item.
- Number Color - Set the color of the number for each item. If left blank, the default template body text color will be used.
- Title Color - Set the color of title for each item. If left blank, the default template color set for the heading tag set in the 'Title Tag' field will be used.
- Caption Color - Set the value color of the caption for each item. If left blank, the default template body text color will be used.
Animation Settings
The J51 Numbers module allows you to animate each number as it scrolls into view. The number will animate from 0 to its value. This tab contains settings for controlling this animation.
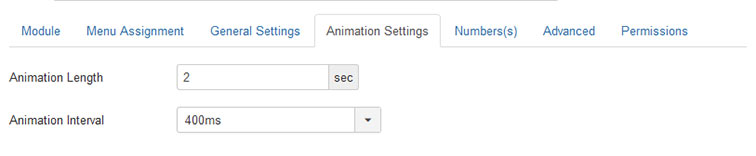
- Animation Length - Set the length of the animation in seconds. This is the length of the animation for each number, from from 0 to its value.
- Animation Interval - Set the interval in milliseconds of the animation between each item. Rather than all progress bars animating at once, this option allows you to set a slight delay between each item.
Numbers(s)
The final tab is where you add the details for each of your numbers. To create a new number simply click the '+' sign for each number you wish to add. This will create form for you to enter the details of the number. To remove a number hit the '-' option. Order of your numbers can be changed by using the drag n drop option at the top right of each form.
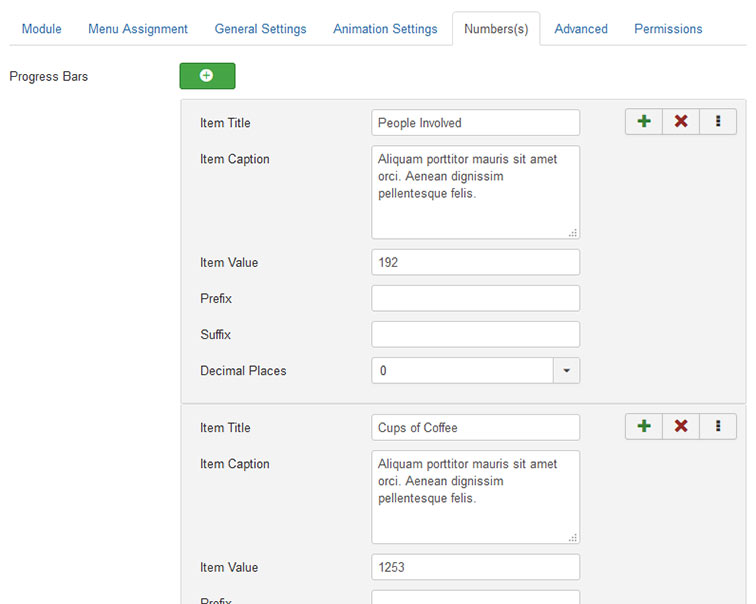
- Title - Set the title for the number.
- Caption - Set the caption for the number.
- Value - Set the value of the number.
- Prefix - Add a character(s) to the beginning of the number.
- Suffix - Add a character(s) to the end of the number.
- Decimal Places - Set the number of decimal places to the number.
A simple, easy to use module allowing you to place multiple images within a rotating slideshow. Each image can be accompanied with animated title and caption. Fully responsive for perfect viewing on every screen size, this module is a nice addition to any homepage. A perfect solution for showcasing items within your site, easily managed within the module settings.
Once installed a new instance of this module can be creating by navigating to Extensions -> Modules -> New -> J51 LayerSlideshow. Available options for this module include the following..
Please note that options available may vary depending on the template.
Settings tab
- Max Height: Set the maximum height of the slideshow in pixels.
- Transition Duration: Set the duration in milliseconds between each slide (1000 = 1 second).
- Slide Interval: Set the duration of the transition in milliseconds between each slide (1000 = 1 second).
- Title Color: Set the color of the overlaying title text.
- Caption Color: Set the color of the overlaying caption text.
- Title/Caption Background: Set the color of the background of the title/caption. If available, set the opacity to 0 to disable the title/caption background.
Image(s) tab
Click the + button for each image you wish to add to the slideshow.
- Slide Title: Set the title text for this item.
- Slide Caption: Set the caption text for this item.
- Slide Image: Set the image for this item. The slideshow can handle any image size however we would recommend to try and keep images below 1800px in width. We find this size the best compromise between image filesize and image quality.
- Slide Link: Set the URL to which this item will link to. Leave this option blank if no link is required.
- Caption Max Width: Set the maximum width in pixels for the title/caption for this item.
- Text Alignment: Set the alignment for the title/caption of this item